


Discover how to easily work with your editor’s tracked changes and comments in Word, including a life-changing pro tip.
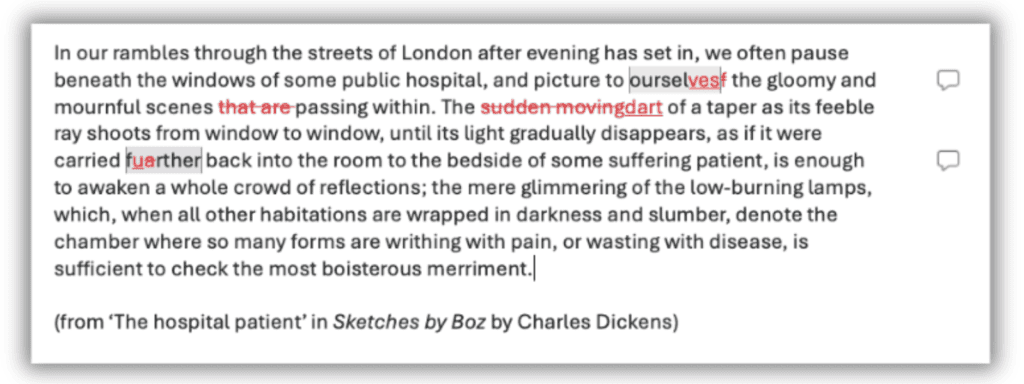
You’ve just got your MS Word edited manuscript back from your editor. Woohoo! You open it, only to discover a colourful onslaught of crossings-out, inserted text, formatting changes and comments.
Where do you even begin working through this apparent mess?
This article will help you make sense of your editor’s fantastic work and keep you sane as you accept or reject their suggested changes and review their comments.
NB. The videos show me using tracked changes in the 365 version of Word, on a Mac. Yours may look a little different but all the advice in this article is still relevant.
About tracked changes in Word
The editing tool of choice for most editors is Microsoft (MS) Word. It offers the best range of tools and plugins for editing, formatting and commenting, and it’s the application that most writers use.
Microsoft’s name for the facility to show which changes have been made is Track Changes (note the initial capitals), or you can refer to them more generically as ‘tracked changes’ (lowercase).
A change is clearly shown in a colour other than that of the original text. The author can then accept or reject the change, retaining control over their work.
Why do editors use Track Changes?
When editors suggest changes to your manuscript, they want you to retain control over your work. Track Changes allows you to see exactly what they have changed, so you can make an informed decision about whether to accept or reject their suggestions.
Your editor may make certain ‘silent’ changes (with Track Changes turned off), but they will ask for your permission before they begin the work. Changes usually made silently include:
- Double spaces to singles
- Rogue spaces before or after paragraphs
- Single quote marks to doubles (or vice versa)
It is standard editing practice to make these minor changes outside Track Changes. If you would rather check every one of these changes yourself, let your editor know so they keep Track Changes on at all times.
Turning Track Changes on and off
Let’s start with the basics. If you’d like to turn off Track Changes so any changes you make from now on aren’t highlighted, go to Review in Word’s ribbon menu and click on ‘Track Changes’. When this option is highlighted in a darker grey, it is switched on. You can see these steps in the video.
Turning off Track Changes won’t affect those changes already marked up. It only turns off the function from now on. If you want to view your document without the tracked changes showing (a ‘clean copy’), I will explain how to show and hide Track Changes later.
Depending on your Word settings, the changes may appear slightly differently in your document than in the video. I’ll explain how to adjust Track Changes settings in the next section.
Changing the layout of Word’s tracked changes and comments
Word provides different layout options for tracked changes and comments. Depending on your needs and preferences, one layout may suit you better than another.
You will find the different options on the Review tab of the ribbon, under ‘Mark-up Options’.
I’ve listed the options below, and the video demonstrates what each view looks like.
- Show revisions in balloons: This view shows the original text in a right-hand panel and only the new text in situ.
- Show all revisions in-line: This is the view you can see in the videos embedded in this article. It shows insertions and deletions in the text itself.
- Show only formatting in balloons: This is a mix of the two previous options, showing revisions in the body of the text and any changes to formatting (e.g. italics, bold) in a right-hand panel.
Show and hide tracked changes and comments in Word
If you can’t see your editor’s changes, don’t panic! The document may be set to Simple Markup or No Markup, meaning the document is displaying as if all changes have been accepted. This view is easily changed.
To toggle between Track Changes views, go to the Review tab in Word’s ribbon, then click on the drop-down menu to the right of the Track Changes button. This will give you four options:
- Simple Markup: A ‘clean’ copy of the document as if changes have been accepted. Comments are also visible. Lines of text that contain a suggested change are marked with a vertical line in the left-hand margin.
- All Markup: Warts ‘n’ all view, showing crossings-out, insertions etc.
- No Markup: A ‘clean’ copy of the document as if changes have been accepted. Comments are hidden and the location of changes isn’t demarcated in the left-hand margin.
- Original: A view of the document as if no tracked changes have been made.
I use the Simple Markup view most when editing, as it prevents me from getting distracted by all the suggested changes I’ve made, but I can still see comments and the approximate locations of changes. The All Markup view can also disguise double spaces and other punctuation and formatting issues, due to the busy nature of the view!
When you’re carefully going through your editor’s markup in Word, you may find the All Markup view most useful.
Pro tip: How to view all changes and a clean copy of your document at the same time
Some authors request a ‘clean copy’ from their editor, as well as one marked up with tracked changes, but there is no need for this. What’s more, you’ll have to administer two copies of your edited manuscript, which can lead to errors and messy version control.
What I’m about to tell you may change your life. (No exaggeration, because it changed mine!)
You can open the same document in a new window and change the Track Changes view, without creating multiple versions. If you make a change to the document in one window, it will instantly be replicated in the other window, because it’s the same document. Quantum!
Here are the straightforward steps on how to use multiple windows for the same document in MS Word:
- Click on View in the ribbon menu of Word.
- Select New Window.
- Move the new window using your cursor, just so you can see both the original window and the new one.
- Alter the Track Changes view in one of the windows. You’ll see the markup view remains the same in the other window.
- Any changes you make in one window will be reflected in the other. If saving changes, you only need to save once, as both windows are exactly the same file. Mind blown!
Watch the video to see this tip in action.
Accept and reject tracked changes from your editor
As you work through the suggested changes from your editor, you need to accept or reject them.
Accept all tracked changes
If you are incredibly pushed for time, or you have been working with your editor for so long, you trust them implicitly and don’t feel the need to work through all their changes, you may wish to accept all changes in one go, without reviewing them.
I wouldn’t advise this approach, however. As many changes will be more subjective than you might expect, it is better that you carefully check your editor’s work to ensure your authorial voice is retained and that the suggested changes are in keeping with your vision for your book.
If you want to take this approach, the steps to follow are:
- Select Review in the ribbon menu.
- Click on the arrow next to ‘Accept’.
- Select either Accept All Changes or Accept All Changes and Stop Tracking.
Watch the video to see how to accept all tracked changes in Word.
Accept or reject individual tracked changes
If the change is a typo or a spelling, grammar or punctuation error, you will want to accept it. You will also accept changes that follow a style guide or improve a clunky phrase. However, many changes will be subjective to a certain degree, and it’s advisable to revise them in case you prefer the original wording.
There are two ways you can accept or reject individual tracked changes in Word. Both are shown in the brief video, or you can follow the steps below.
From the ribbon menu
To accept or reject tracked changes in Word from the ribbon menu, follow these steps (shown in the video):
- Select Review in the ribbon menu.
- In your document, position your cursor on the change you’d like to accept or reject.
- Click on ‘Accept’ or ‘Reject’.
- Your cursor will automatically go to the next suggested change.
- Click on the arrow next to ‘Accept’ or ‘Reject’ for more options.
From within the text using the contextual (right-click) menu
To accept or reject Word’s tracked changes from within the text, simply right-click (or whatever your system’s equivalent of this is) on a change, and choose ‘Accept Change’ or ‘Reject Change’. Easy peasy!
Reviewing your editor’s comments in Word
As you’re working through your edited manuscript, make sure you can see your editor’s comments. These will appear to the right of the main body of text.
If you can’t see any comments, check they’re switched on. It’s highly unlikely that your editor didn’t leave any comments! On the Review tab, find ‘Show comments’ and make sure this option is highlighted in dark grey.
Please bear in mind that an editor’s comments should never be judgmental or make you feel criticised or belittled. If this is the case, I’d strongly suggest finding another editor for your next book. Professional, skilled editors understand the hugely personal, soul-laying-bare journey of writing a book and share your passion for your work. I can’t emphasise this enough. If your editor doesn’t make you feel good about your book, don’t go back to them for more!
There are two modes in which you can display comments: Contextual and List. You can change between these two options by clicking on the down arrow to the right of ‘Show comments’.
Resolving and replying to comments in Word
If you have arranged to return your manuscript to your editor for another pass, you can reply to some of their comments. They will pick up your reply when they open the document. Resolve a comment (to retain a record) or delete (to remove forever) those that no longer require action, to keep things neat and clear.
Replies to your editor’s comments can also be useful as notes to yourself, to remind yourself to do something.
There are three places you can resolve or reply to comments. All three have the same result, so the one you use comes down to personal preference or which ‘view’ you’ve selected to see comments and changes. These three locations are:
- right-hand panel
- ribbon
- contextual (right-click) menu
See all three methods (and me being flummoxed at timestamp 04:40) in the video, or follow the steps below.
Dealing with Word comments in the right-hand panel
If you can see the comments in the right-hand panel and would like to resolve or delete one, click on the three dots on the comment in question and select either ‘Resolve thread’ or ‘Delete thread’.
To reply to a comment that you can already see in the right-hand panel, simply click in the ‘Reply’ field below the comment. Once you’ve written your reply, tap the Send icon (paper aeroplane).
Dealing with Word comments from the contextual menu (right-clicking)
You can also resolve, delete or reply to Word comments by right-clicking. Place your cursor on the comment in question, right-click (or use the relevant shortcut), and you’ll see the options.
Dealing with Word comments in the ribbon
There is also an option to resolve and delete comments from the ribbon. Put your cursor on the relevant comment, then click on Resolve or Delete in the ribbon. If you click on the arrow next to the Delete icon in the ribbon, you’ll see additional options, such as deleting all resolved comments and deleting all comments in the document.
In summary
Dealing with Track Changes and comments in MS Word isn’t as complex as it might appear at first. Find your favourite markup view and way of dealing with tracked changes and comment, and you’ll soon be looking forward to dealing with all those suggested changes from your editor!


Michel Drouin
I made replies to my editor’s comments on the tracked Word file I was sent , then sent it to myself as a test and the comments and reply panel disappeared.
What is going wrong?
Thank you,
Michel Drouin
Debbie Emmitt
Hi Michel, have you checked the Markup settings on the Review tab? It could be set to show no changes. Ensure it’s showing ‘All Markup’. If it is, maybe try contacted Microsoft Support. Let us know how you get on, as others may be having the same issue!